A lot of my friends and family have asked me how I have put together my own personal media server. I wrote this guide to help my friends and family, but if you find this useful as well feel free to donate using the PayPal button below!
I’ll use a few terms in my guide below, here is a quick glossary:
Operating System – Unraid – https://lime-technology.com/pricing/
Sonarr – TV Series tracker and snatcher
Couchpotato – Movie snatcher
SABnzbd – Download client
Plex – Front end media player – www.plex.tv
www.PCPartPicker.com – where you can configure a hardware build and ensure all your components work together
First, you need to either buy or build a computer which will be able to run unraid and work as a headless application server. (Headless means it is operating without a display, you operate it over a local browser connection)
Considerations to be made when creating a server are as follows:
- Storage – this is how much data your system will hold. Unraid can manage multiple hard drives all connected and treat them as a storage pool. You can choose one or two hard drives to be the parity drive (the dedicated hard drive that keeps a record of all other drives content). This is for fail protection. With one parity drive, any 1 hard drive can be lost without any data loss. With two parity drives, two drives at the same time can be lost without any data loss. The downside to two parity drives is that you lose an extra hard drive for storage. I personally use a 8 hard drive setup; 1x 3TB drive as my parity, 5x 3TB drives for my storage, and 2 SSD drives, one is my dedicated cache, the other is dedicated for my virtualized application of Windows. On average, a full feature length blue ray is about 10gb, and TV shows can be 2-5gb/hr. I recommend 15tb or above for storage.
- Size and number of drives – How big of hard drives do you want? At the time of this writing, 2tb drives can be found for as little as $35 each. 10tb drives run for around $350. But, you have to consider how many SATA ports are on your motherboard. My motherboard had 6 SATA 6gb/s ports, I added two more through a pcie extender card. I recommend Western Digital Red hard drives (made specifically to be always running) or HGST Ultrastar hard drives. I recommend buying refurbished as those units are pre-tested so you know they work, and they are often cheaper!
- Physical limitations of computer case – how many 3.5” disk drives can your computer case hold? You need to take that into account when choosing your computer case.
- CPU – The CPU will be important for streaming that media out to your multiple devices. The more powerful the processor, the better. You can compare the performance of processors by looking up their passmark scores on google. For each 1080p stream from your server, figure you will need a 2000 passmark score. If you want to be able to have 4 streams at once, you need a processor with a passmark score of 8000 or above. I recommend an i7 if you can – the i7-7700 has a passmark score of 10,796, which would allow for up to 5 simultaneous streams from your server (as long as your internet upload speeds allow for it).
- Motherboard – Choosing a motherboard can be one of the hardest things to do, you want to look for a motherboard that fits your processor chipset, but you also want to look for how many SATA connections it allows for. How many sticks of ram can you add? What are the ports on the back? At minimum you would need Ethernet and hdmi.
- RAM – RAM is easy to choose, get as much as you can for as cheap as you can. Try to buy ram sticks in pairs when possible. I recommend 16-32gb of ram.
- Power supply – You need a power supply to run everything, I recommend purchasing a platinum or gold power supply unit as those are more efficient and will save you money in the long run. Use a site like PCPartPicker to ensure your power supply will power all your components!
- Case – There are lots of cases out there – just be aware of how many hard drives the unit can hold, and what size motherboard it holds. Most cases come with fans built in, make sure your components are able to get enough ventilation!
- OPTIONAL – Graphics card – this is not needed for your media server, but if you want to have your server pull double duty and virtualize an instance of windows, you can use this graphics card to display that virtual machine.
For an example – you can see my full build here: https://pcpartpicker.com/list/ncKCRG
Once your computer is assembled, follow these steps to setup unraid by purchasing the license, downloading the software and installing the boot drive onto a USB which you will leave plugged in permanently. Choose a low profile USB if possible.
Once your server is up and running, you will want to configure the drives, set one or two drives as the parity drive, and the rest as storage drives. You can have drives dedicated to certain things or have it all setup as one big pool storage. Don’t click on parity check just yet, do that after everything is setup (parity check takes around 24 hours)
Next, we’ll click on the Shares tab in the unraid dashboard. Think of shares like file folders in windows. Let’s make a few shares, click the add share button and make the following shares:
Appdata
Movies
TV
Great! Go ahead and click on the plugin tab now, from there click install plugin and paste:
https://raw.githubusercontent.com/Squidly271/community.applications/master/plugins/community.applications.plg
After installation, a new tab called “Apps” will appear on your unRaid web interface.
Once that is done we can go ahead and start setting up Docker images by clicking on the apps tab. Think of Docker images as apps in the app store. Each one does a specific thing. The great thing about docker images is that each unit is contained. If one encounters an error the rest will continue to work. Everything is separated in its own little box!
In the apps tab, search for plex, SABnzbd, CouchPotato, and Sonarr. Use the linuxserver author when you can, binhex also works.
Once you add those docker images, click on the docker tab to see whats running. You will see port mappings that each application will use for its web interface. Make sure to include these port mappings on your routers port forwarding settings You can type in the address – for couch potato mine is 192.168.1.245:5050 – 5050 is the dedicated port and 192.168.1.245 is my local IP. You can also access these ports through an external ip if you setup the port forwarding on your router. (So you can add movies and tv while not at home!)
Now we have to get each of the services up and running.
Let’s start with SABnzbd – once there, click config in the top left corner. Click the General tab and scroll down to the bottom. Copy and paste both API key and NZB key in a separate window, you’ll need these later. In the folders tab, you will have to choose the designated download folders – I used appdata/config/downloads/incomplete for my temporary download folder and appdata/config/downloads/complete for my completed download folder. Next, click on the servers tab. These are the servers where SABnzbd will look for the requested files. I recommend having multiple servers setup for this. I use the following with this priority order: (priority determines where SABnzbd looks first)
- frugalusenet.com
- news.astraweb.com
- tweaknews.eu
- blocknews.net
- usenet.farm
- [email protected]
- eunews [email protected]
After signing up on each of these sites or purchasing a download block allotment, you will get an email with the server details you need to enter when you click on “Add Server”.
Next, you need to set up categories – this will tell SABnzbd where to put the files once done downloading.
Set Movies as the category, and the folder path to /Movies (this is the share you set up earlier) Click Save.
Do the same for TV, put TV as the category and the folder path to /TV. Click Save
You’re all done with SABnzbd for now!
Go ahead and open up CouchPotato – click the gear icon in the lower left corner. Then, click on downloaders. Here, go ahead and toggle SABnzbd on, enter your host IP (mine is 192.168.1.245:8080) and enter the API key and NZB key you copied from SABnzbd earlier. If you lost it, it can be found on the general tab of the config settings in SABnzbd. Type in Movies in the category field.
After, go ahead and click on the searcher category, and enter the server info from the same servers you put in SABnzbd. See screenshot below:
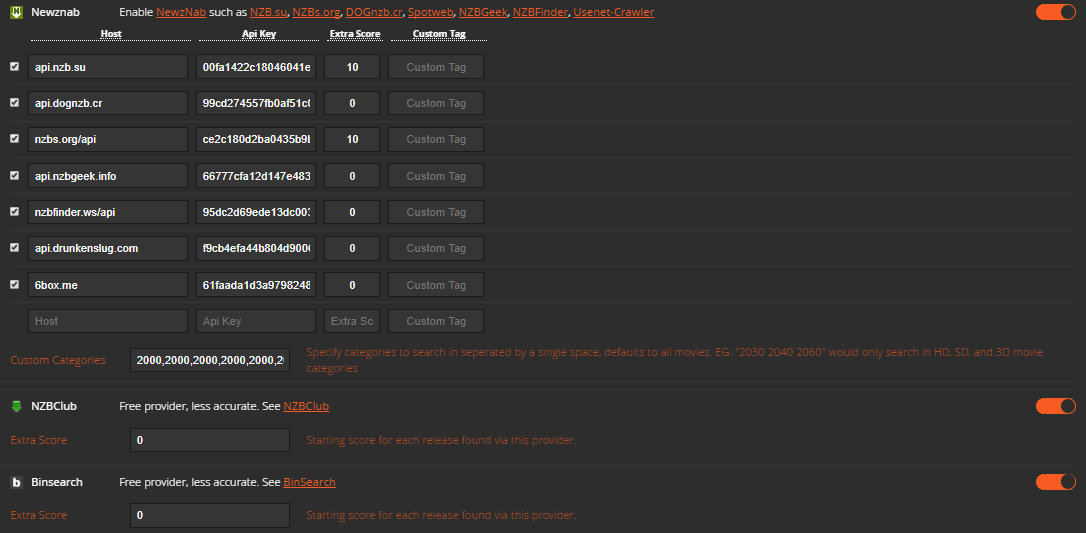
Next up, let’s go over to Sonarr. Click settings on the top bar. Go ahead and click the indexers tab, and hit the plus sign to add an indexer server.
Then, click on the download client tab. Make sure to enter in your host IP, port 8080 for SABnzbd, and the API key from SABnzbd. The category is TV. Test the connection, if good, save and close.
Next, we will signup for a plex account. I purchased a lifetime membership of plex pass so I can download the apps on apple, and android, plus I get access to new features earlier. Once you sign up, go ahead and log in and hit launch in the upper right hand corner. Click on settings, and make sure remote access is enabled. You’re all done!Let’ss test everything out to make sure it is working.
Head back over to couchpotato and search for a movie in the search bar. Once the results pop up, click on the desired item and select the quality you want to search for. I usually hit best unless I want to save space. Click add, and then couchpotato will start looking for it.
Open up a new tab and pull up SABnzbd, by now, you should see an item being downloaded. Once it finishes, SABnzbd will check and verify the file is complete before adding it to your server. Once finished verifying, It should now be able to be played from plex! Head over to plex and see if your item is there. If it isn’t, try refreshing your library in plex. If nothing still shows up, take a look at the settings and make sure everything is setup correctly and that the docker’s are pointing to the correct folder paths.
If it works, awesome! Try going to Sonarr to add a TV series. Click the add series button, and type in the series you want to look for. You can click add, and whether to monitor the latest season, all the seasons, or future episodes only. See if those episodes start to download!
Enjoy your awesome new media server!
0 Comments