One of the biggest frustrations in today’s modern world is when the internet goes out. In my personal life, I want a stable internet connection at home to ensure my personal server and smarthome gadgets function correctly, but my connection has been going out multiple times per week. I called my internet provider and they have all the outage logs, and all the leverage in the refund conversation. Asking them to review the logs on their end over the last two months got me $80 back recently, but I wanted to find a way to keep my own logs as well.
Thinking I could use my spare Raspberry pi for this task, I looked to the internet and found an article by Alasdair Allan titled; Use Raspberry Pi to Measure Broadband Speeds to Hold Your ISP Accountable. This project was exactly what I was looking for, the Raspberry pi will run speed tests with speedtest.net and log the data to a Google Sheet on your Google Drive.
While the walkthrough showed the end result, some steps aren’t explicitly listed. I want to document the simplest steps to getting this project setup – I hope this is helpful for others out there!
Here is what will be needed to complete this project:
- Raspberry Pi (I used a Raspberry Pi 3b)
- IFTTT account
- Google account (either a Gmail or Google for Work account)
Open up the Terminal
sudo apt-get update
sudo apt-get upgrade
Once your Raspberry Pi is up-to-date, we will set it up for speedtest tracking. Continue typing the following commands into Terminal:
sudo apt-get install python-pip
sudo pip install speedtest-cli
Next, make sure speedtest-cli works by running it:
speedtest-cli
You should see a result similar to this (I have modified some information for privacy)
Retrieving speedtest.net configuration…
Retrieving speedtest.net server list…
Testing from YOUR ISP (xxx.xxx.xxx.xxx)…
Selecting best server based on latency…
Hosted by ISP Server (Earth) [114.67 km]: 31.624 ms
Testing download speed………………………………….
Download: 74.21 Mbit/s
Testing upload speed…………………………………………..
Upload: 6.02 Mbit/s
Next, we will get another script to help format the text for easy of transferring it to a spreadsheet. Lets install speedtest-cli-extras:
git clone https://github.com/HenrikBengtsson/speedtest-cli-extras.git
Now, we will test the new script to see its output:
cd speedtest-cli-extras/bin
./speedtest-csv
This command will take a little bit of time after you execute speedtest-csv and when it provides an output similar to below as it is running the speedtest in the background.
2017-08-22 11:14:52;2016-02-22 01:01:51;YOUR ISP;xxx.xxx.xxx.xxx;ISP Server (Earth);103.82 km;43.183 ms;22.98 Mbit/s;2.26 Mbit/s;http://www.speedtest.net/result/xxxxxxxxxx.png
If the output looks similar to above, great!
We will then move on to the next section in IFTTT to allow our speedtest data to be logged into a Google Sheet.
Open up a browser window, and then connect to the Google Drive IFTTT channel. Make sure that you allow the Google Drive channel to have access to the account that you want your results to be saved to.
Next, connect to the Webhooks IFTTT channel. With that complete, we will then need to add the Log Speedtest results to Spreadsheet recipe to our account.
Click this link to navigate to a pre-made recipe already setup – Log Speedtest results to Spreadsheet
Make sure that you set the name the recipe “speedtest” before you click the Add button
Now that the IFTTT section is setup, let’s jump back to the local Terminal window. We will now get an IFTTT version of the speedtest-csv script:
wget https://gist.githubusercontent.com/aallan/bafc70a347f3b9526d30/raw/b9760af4b29fad0335c20a8a24607a52bba0cb6f/speedtest-ifttt.sh
This will place a copy of speedtest-ifttt.sh in /home/pi/speedtest-cli-extras/bin.
We will need to modify to include your Webhooks Secret Key, and then make sure that the script can be be executed. Open speedtest-ifttt.sh in nano:
nano speedtest-ifttt.sh
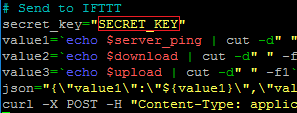
Scroll down towards the bottom of the file, and change the SECRET_KEY text to your key from the Webhooks IFTTT channel page (Click the documentation button to see the secret key, copy it, and paste between the yellow quotations)
Once complete, save (Ctrl+O, then enter) and exit (Ctrl+X). Now, we will make sure that the script is executable:
sudo chmod +x speedtest-ifttt.sh
To test this and make sure that it works type:
./speedtest-ifttt.sh
Once complete, you should see the following message:
Congratulations! You’ve fired the speedtest event
Now check Google Drive, you should have a new Speedtest sheet under a new folder called IFTTT.
When you open it, you should have a new row with the results:
| August 21, 2017 at 11:17 AM | 34.365 | 71.96 | 5.89 |
Now that we are logging our results, let’s setup a recurring command by setting up a cron script. For the sake of logging, we will create another script to run speedtest-ifttt.sh with some extra local outputs. First, create speedtest-cron.sh:
nano speedtest-cron.sh
Paste the following:
#!/bin/bash
date >> /home/pi/speedtest.log
/home/pi/speedtest-cli-extras/bin/speedtest-ifttt.sh >> /home/pi/speedtest.log
echo “” >> /home/pi/speedtest.log
This will create a quick access log that can be checked locally from first sign on with less speedtest.log, and will append it after each running. Before we test it, lets make sure that the script is executable:
sudo chmod +x speedtest-cron.sh
Ok, now let’s test it out:
./speedtest-cron.sh
You should see a new line in your Speedtest Google Sheet, and when you run less speedtest.log, you should see a result like this:
Tue 22 Aug 11:19:16 UTC 2017
Congratulations! You’ve fired the speedtest event
crontab -e
Scroll to the bottom of the file, then paste the following:
# Run Speedtest script “speedtest-cron.sh”
0,15,30,45 * * * * /home/pi/speedtest-cli-extras/bin/speedtest-cron.sh
0 Comments